Showing posts with label party decor. Show all posts

Thursday, December 1, 2016

Mum's 60th Birthday

Mum turned 60 yesterday and I wanted to give her a special day as we celebrated this milestone.
She didn't have a party this year as friends and family are scattered everywhere so I decided to put together a day that she would enjoy and know how much we love her.


The boys gave Nanna her gifts and enjoyed flicking through the photo books that we made her.

Then Simon, Finn and I took her out for lunch at Manly Wine.  
The sun was shining and we had a table right near the window looking out to the beach. 
Champagne + grapefruit margaritas added to the delish lunch!


Later in the afternoon I arranged for a few friends and family to pop in for afternoon tea.
I wanted to make the table set up look amazing and festive, so I added a fringed garland backdrop and a vine covered 60. 
(I shaped the 60 out of  wire coathangers and wrapped them in fake ivy from Spotlight.)


I put together a selection of sweet and savoury food and Simon made his famous pavlova.
We popped some champagne in a bucket with flower ice. An idea I had seen on Pinterest and was dying to try.  It all looked very pretty and perfect for mum's special day.


Friends and family arrived and we settled in for a lovely afternoon.
We had such a great day and felt we had well and truly celebrated mum turning 60.
Happy birthday mum, we love you xx


I was asked where I got a few items so I've put together a list  in case you're interested......

Tree stump chopping boards - Big W
Crepe paper for garland - Big W
Gold cutlery - Big W
Artificial ivy - Spotlight
Gold cake stand - Domayne
Good Times napkins - H&M Home
Silver ice bucket - Ikea

Have you had any birthdays in your house recently?

Now all our birthdays are over it's time to think about Christmas.  I must get organised!
How is your Christmas prep coming along?

Wednesday, May 20, 2015

DIY Kid's Birthday Party decorations and fun party food ideas.

Jasper is turning 8 on Friday and I've been thinking of cute ideas to celebrate his birthday.
I love these fun DIY party decorations from Studio DIY.


DIY Birthday Confetti Popper 
details here


DIY Birthday Cake Box
details here


Tips on how to ice the best Birthday Cake ever
details here

A fun photo booth idea via designlovefest.com

DIY candle holder via paperandlace.com

String art via 100layercake.com

I've also been browsing Pinterest for fun party food and I'm loving these ones....


All a bit of a sugar hit! 

Jasper is having a party with a few school friends and we've outsourced it and having it at our local Trampoline/Flip Out place. I find Autumn/Winter birthdays so hard as you can't rely on the weather for something outdoors.  I won't have to do anything for this party but I always like to celebrate on the actual day with a cake and afternoon tea with the family and of course balloons!

Do you have any birthday's coming up?

What is your favourite type of party food

Saturday, July 5, 2014

What I'm loving this week.

Here are a few little things that caught my eye this week


Shibori bag - Hunt and Bow

House magazine rack - Green with Envy
Watermelon cushion - Made by Mosey

Coffee Mug - Miss Poppy Design

Canape flags - Simply Sweet Soirees

What's caught your eye lately?
Have a wonderful weekend x

Tuesday, February 11, 2014

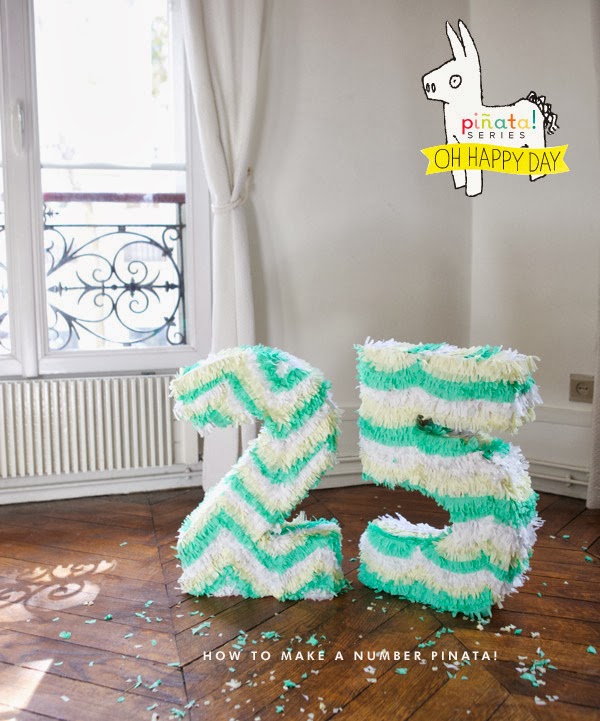
Tutorial Tuesday - How to make a number piñata


I saw this tutorial for a Number Pinata on Oh Happy Day. I love this idea for Noah's 2nd birthday. 
Although I probably won't use it as a piñata I like the idea of it as a decoration for the party table and as a photo prop.

Here is how to do it-
Materials needed: Cardboard, Exacto, Pen, Ruler, Tape, Crepe Paper, Glue
1. Making the structure. Stack two pieces of cardboard together. Draw your number and then cut through the two layers of cardboard at the same time. (Be sure to put some layers below them so your floor doesn’t get cut too! Our pinatas were about 20″ tall.
2. Cut strips of cardboard for the edging. Our strips were about 4″ thick.
3. Taking the strips tape together the top and the bottom piece on the seam. Reinforce it on the top and also on the inside.
4. When you get to an edge just make a crease in the cardboard so it bends easily. Making the structures is really easy and took about 20 minutes. These held together well after getting beaten with a stick but if I was making this for adults I would reinforce it with another layer or two of paper and glue. (Just apply glue to strips of paper and wrap the structures to give it extra support.)


5. Decorating takes longer especially if you are doing a design. Take the crepe paper and make some fringey garland. (I explain in detail how to do that here.) First cut a strip of crepe paper about 3″ thick.
6. Cut each side of the strip into little pieces of fringe.
7. Unravel it and fold it in half so it is ready to glue.
8. I made a zigzag design and a scallop design for these two numbers. To maintain the design I drew lines on the number depending on how far apart I wanted the zigzags or scallops and then used that as a guide as I laid down the fringe.
9. Start at the bottom and draw the design in glue. Take the fringe and put down a layer.
10. Repeat adding glue and then another layer of fringe on top until your design is done. This part takes a while so best to put on some Friday Night Lights in the background since its a little mindless (and definitely goes quicker with a helper.) It’s nice because the fringe looks messy so it is really forgiving if you lay something down kind of crooked.
11. Cut a section at the top too add candy and then repair with paper, glue crepe paper. To hang cut two holes at the top and thread string through.


What do you think? Something you would try?

All photos and instructions by Oh Happy Day
Related Posts Plugin for WordPress, Blogger...
Pin It button on image hover