Showing posts with label tutorial tuesday. Show all posts

Tuesday, September 30, 2014

Tuesday Tutorial - Pomegranate Fro-Yo Bites

I saw this quick tutorial on Pinterest the other day and it caught my eye as it includes 2 of my favourite things. 
Fro- yo and pomegranate.


It looks so simple and delicious. 
These would be great for the boy's afternoon snack.
You could really substitute the pomegranate for other fruit if you preferred.

Are you a Fro-Yo fan?

Recipe and photos by Ziploc

Tuesday, June 17, 2014

Tutorial Tuesday - DIY Jelly Playdough


Today I chose a playdough tutorial from Modern Parents Messy Kids. I loved that this one had a twist and was made with jelly/jello. During Winter it's always great to have a few activities up your sleeve when the kids are going stir crazy from being inside.

I'll be swapping the jello for Aeroplane Jelly :)

Homemade playdough – If ever there was a quintessential DIY this is it!  Parents and children have been happily cooking up this stuff at home for decades.  Today our newest contributor Kaley is sharing her favourite play dough recipe using another kid classic: Jell-O (because it just wouldn’t be an MPMK post without some sort of twist). 

I think you’re going to love this recipe.  Kaley promises it comes out silky smooth and I could practically smell the fruity scents wafting form my computer as I read her post.
What kid doesn’t love play dough?  Squishy, cool, bright, and so fun to play with. Even better, it helps develop fine motor skills and imagination (check out lots more on the benefits of play dough here).  Instead of going out and buying commercial Play Doh, try making it at home!
It’s super easy, inexpensive, and a perfect project for the kids to help with. We love making our own play dough, and after trying a handful of different recipes we finally found a winner.  This play dough comes out in beautiful, soft shades, smells delicious, and feels the closest to store bought Play Doh of all the recipes we’ve tried.


You will need:

  • white flour – 1 cup
  • warm water – 1 cup
  • salt – 2 tbsp
  • cream of tartar – 2 tbsp
  • cooking oil – 2 tbsp
  • Jello – 1 3oz pack

Mix all ingredients together in a saucepan


Keep mixing until all the lumps are gone.


Cook over medium heat, stirring continuously until it thickens into a ball of dough.  This step does take a little while.  Just keep stirring, you’ll know it’s ready when won’t be able to stir anymore.


Once it has finished cooking, place the dough onto a silpat mat or floured cutting board and wait for it to cool.


Once it is cool (at least 20-30 minutes) let the little ones knead it, adding in flour until it is no longer sticky (about 1/2 cup).  At this point, you can add in extra food coloring to make the colors more vibrant, or even add glitter.  I like to keep things simple, so this is how it looks with just the Jello.


This recipe makes a lot of play dough.  You could easily half the recipe, and there would still be plenty to play with.


Now let their little imaginations run wild.  My little one will literally spend hours playing with her play dough.  I love seeing what games she comes up with, and what tools she picks out to use with it. We don’t have special play dough tools, I let her rummage through the kitchen and use whatever plastic container or other child safe object she finds.


When you are finished playing, store in the refrigerator in an airtight container.  It will keep for at least a few weeks in the refrigerator, with daily use.  If at any time it starts to be a little sticky, just add more flour.

All photos and text by Modern Parents Messy Kids

Has anyone tried this before? 

I'm definitely going to give it a go with some Aeroplane Jelly!


Tuesday, April 8, 2014

Tutorial Tuesday - DIY Dinosaur Serving Dish

I  loved this dinosaur dish I came across on Three Little Monkeys Studio. I think the Oreo's caught my eye as they and dinosaurs are big favourites around here.


You could also use another animal to suit your theme.
Maybe a bunny for Easter?

DIY  DINOSAUR SERVING DISH

Cost of supplies: Free if you raid your kid’s toy box and garage, but none of these items were more than $4 each in stores.
Time: Ready in 2-3 days

Materials
  • Hard plastic dinosaur toy (it needs to be sturdy and balanced*).
  • Small melamine plate
  • Sand paper
  • Adhesive (I used Loctite Stik’N Seal)
  • Spray paint (my heart belongs to Rustoleum)
  • Hand held saw (I used the FatMax Multisaw)
  • Parchment paper for lining the plate

Directions
  1. Use the handsaw to cut off your dinosaur’s head just above the shoulders. Use steady strokes to keep your cut level. Use the sandpaper to smooth the edges of your cut.
  2. Use the sandpaper to lightly sand the surface on the bottom and top of the plate where you will be adhering the dinosaur. No need to sand the entire surface.
  3. Apply your adhesive to the body and plate. My adhesive recommends applying to both items you want to glue together, and allow them to set for 5-10 minutes BEFORE adhering. When ready, attach the plate to the body. Touch ups can be done around the glue site with a damp paper towel. Allow to cure for 24 hours.
  4. Once the body and plate have dried and cured, prep the dinosaur’s head and attach to the plate. You will need to eyeball it from the side and front before attaching to make sure it is in the right spot. Perform any touch ups and allow to cure for 24 hours.
  5. Once completely dried, you can start painting. Spray paint from all angles and underneath. I like to spray one coat at a time every 20 minutes or so to avoid drips and get the best coverage.
  6. Once your guy is dry, line with a circle of parchment paper cutting a hole out of the middle for the head and trimming to fit.
Update: Some readers were concerned about food safety and missed my recommendation to use parchment paper so that the food does not come into contact with the painted plate. If you have already have a white plate, it would be preferable to use that of course. I was just repurposing an old princess plate I had on hand, so that is why I painted it. Food safety first!
* My dinosaur wasn’t quite balanced, so I used a small piece of felt pad stuck to the bottom of one foot, and voila!
Isn't this great?!
Who's going to try it?
All text and photos by Three Little Monkeys Studio


Tuesday, April 1, 2014

Tuesday Tutorial - DIY Confetti Dipped Easter Eggs.

I came across these gorgeous Easter Eggs the other day by Studio DIY. Their pretty colours and sparkly confetti caught my eye.

This would be a perfect craft for the little ones or I would use them to decorate my dining table at Easter.


Supply List

Eggs - hard boiled or hollowed out
Craft paint
Paint brushes
Drying rack (optional but makes life easier!)
Decoupage glue/Mod Podge
Foil Confetti


To make
First you've got to paint those eggs and let them dry completely.


Once dry, apply a thin coat of mod podge to the part of the egg you want covered in confetti. Then immediately sprinkle confetti over the mod podge till it’s covered! 
Let dry completely on the drying rack again.


And yes folks, its as simple as that.


All instructions and photos by Studio DIY. Check out their site as they have so many fabulous ideas.

Do you do any Easter crafts?

Tuesday, March 25, 2014

Tutorial Tuesday - cardboard cactus by Beci Orpin

I'm thinking about making a few of these for the boys rooms.
Could you get a more low maintenance plant?!

I was flicking through Beci's book Home and came across them and thought they'd be perfect.
They would also be perfect for a Mexican themed party.


I couldn't find any links to instructions on how to make them but they look pretty self explanatory.
I did find a link for the cactus template here


What do you think?
Would you give it a try?

You can buy Beci's book Home here

Tuesday, March 11, 2014

Tutorial Tuesday - Very Best Chocolate Fudge Sauce

Something a little different for Tutorial Tuesday today. The Very Best Chocolate Fudge Sauce.
I loved this one as chocolate sauce is so versatile. Perfect for cakes, ice cream topping etc. I think I will be using it for Noah's birthday coming up.


The recipe, text and photos are from Sophisticated Gourmet
Doesn't it look delicious?!

This chocolate sauce recipe is quite easy to remember, as it (conveniently) requires most of the ingredients to be ⅓ cup.
6861524362 a5a30156aa Very Best Chocolate Fudge Sauce Recipe 7007640287 1b1dedf556 Very Best Chocolate Fudge Sauce Recipe
It all starts with chopping 3.5 ounces (100g) of luscious dark chocolate and earthy-brown cocoa powder being mixed together in a heatproof bowl over simmering water.
Once the pool of chocolate has melted, golden syrup is mixed in. After that, a slug of cream, an avalanche of snow-white confectioner’s sugar, a splash of vanilla, and a pinch of sea salt are mixed into the sweet chocolate puddle.
Once everything is mixed together, it’s poured onto waiting cups filled with scoops of hand made ice cream. Everything is then sprinkled with pistachios, sliced almonds, and chopped almonds.
 6861521682 922dcd091b Very Best Chocolate Fudge Sauce Recipe 7007637659 92b0555844 Very Best Chocolate Fudge Sauce Recipe 
Now, I might have alarmed a few of you with the golden syrup. Golden syrup is one of those ingredients you have passed in the isle with maple syrup, honey, and pancake syrups, at your local grocery store / supermarket, without paying it any mind. Here in Middle-of-Nowhere, New Jersey, it’s nearly impossible for me to find certain ingredients, but Golden Syrup doesn’t fall under my list of hard-to-find ingredients. I can find it at all of our local supermarkets and grocery stores without a problem. This sweet, mellow amber elixir is basically cane sugar syrup, and it’s perfect on pancakes (I dare you to try it with your pancakes this weekend!), and in this instance- adds a lot of depth to this chocolate sauce. If you do have trouble finding golden syrup (I use Lyles), feel free to use light corn syrup or light agave nectar in place of it.
7007637231 2ec451a3dc Very Best Chocolate Fudge Sauce Recipe 7007635957 4c66d98279 Very Best Chocolate Fudge Sauce Recipe
Very Best Chocolate Fudge Sauce Recipe
Makes about 1 cup / 236ml

As stated in the post, Golden Syrup should be quite easy to find (it’s usually near the pancake syrups, honeys, etc. At the grocery store). If you can’t find it, light corn syrup or light agave nectar will work well, too.
Although Dark Chocolate with 70% cocoa content may seem a little too dark for any milk chocolate lover’s liking, that is not the case–I find it works perfectly, especially since it is diluted a bit by the cream and the other ingredients. 70% cocoa content is ideal, but if you don’t have that on hand, use whatever you have– I wouldn’t go below 64% cocoa content, though.
Ingredients:
3.5 oz / 100g dark chocolate with 70% cocoa content, finely chopped
2 Tablespoons / 15g unsweetened cocoa powder (natural or dutch-processed)
⅓ cup / 116g golden syrup / light corn syrup / light agave nectar
⅓ cup / 75g heavy (double) cream
⅓ cup / 30g Confectioner’s (Powdered) Sugar
½ teaspoon pure vanilla extract
Pinch fine grain sea salt

Preparation:
Place the chopped dark chocolate and cocoa powder in a heatproof bowl over simmering water (do not let the bowl touch the water) and heat until the chocolate has melted.

With the pan off the heat, stir in the golden syrup, followed by the heavy cream, confectioner’s sugar, vanilla, and pinch of salt.
Transfer to a glass jar or heatproof container with a lid, and serve over the ice cream of your choice. Can be stored in the refrigerator for a few days (that is, if you’re not sharing!). Re-warm before serving.
You can find more delicious recipes from the Sophisticated Gourmet here

Tuesday, February 25, 2014

Tutorial Tuesday - DIY Washi Tape Heart Installation

I'm loving having a place to keep all of these creative ideas that I hope to try one day.
I think the more simple I keep the craft, the more chance I have of doing it.
This is why this Washi Tape Heart, found here appealed to me.

You'll need:
* white cardboard - cut in the shape of half a heart
*pencil
*washi tape (I get mine from Little Paper Lane)

Use the cardboard to trace a heart onto the wall. Starting at the top, apply torn pieces of washi and make sure they stick well. The pieces can be different sizes, but I didn’t tear any longer than 2.5″. Work your way down the shape until you reach the bottom.


And you’re done!
 Run your hand over the tape to smooth out any edges.


There you go! I think this would look great in a child's or adult room over the bed.
The bigger the better!

Have you got any Washi tape at home?
Are you going to try it?

All photos and instructions written by Lexy at The Proper Pinwheel

Tuesday, February 18, 2014

Tutorial Tuesday - A Flubber Recipe

I came across this tutorial the other day on Mr Printables
Such a cool and fun site. I thought this would be something easy and lots of fun for the kids.


What is it that’s so magical about flubber? It’s a liquid and a solid, moldable, but firm, gooey and squishy all at the same time. 
It’s an ideal indoors table craft. Just throw in a few cookie cutters, toy dishes or silicone moulds and the possibilities are endless. It’s also non-toxic and easy to make. 

Below is a recipe, but before you begin remember this…if it ever finds it’s way into clothing or hair and dries, just dab it with vinegar and in a few minutes it will become soft enough to rinse and remove.
Step 1
Combine and mix well
-2 cups Elmer’s Glue
-1/4 cups warm water
-Food colouring of your choice
Step 2:
In a separate bowl, combine and mix well:
-3 tsp. Borax
-1 cup Warm Water

Step 3:
Pour the first mixture into the second. There’s no need to stir. It makes itself! Once most of it has formed into a big glob with just a little bit of water floating on top, pour off the excess water and knead the flubber for a minute. Store it in an airtight container between uses and it will last for a week or more. Enjoy!
Have you made Flubber before?
All photos and text from Mr Printables.

Tuesday, February 11, 2014

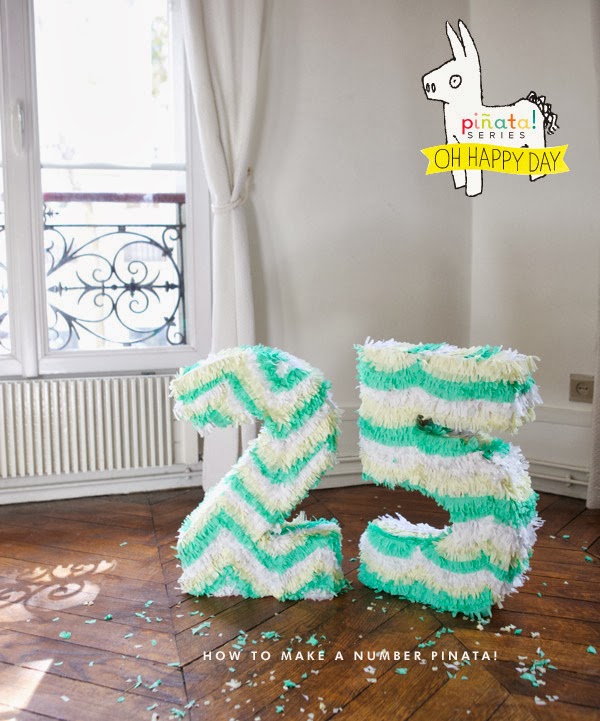
Tutorial Tuesday - How to make a number piñata


I saw this tutorial for a Number Pinata on Oh Happy Day. I love this idea for Noah's 2nd birthday. 
Although I probably won't use it as a piñata I like the idea of it as a decoration for the party table and as a photo prop.

Here is how to do it-
Materials needed: Cardboard, Exacto, Pen, Ruler, Tape, Crepe Paper, Glue
1. Making the structure. Stack two pieces of cardboard together. Draw your number and then cut through the two layers of cardboard at the same time. (Be sure to put some layers below them so your floor doesn’t get cut too! Our pinatas were about 20″ tall.
2. Cut strips of cardboard for the edging. Our strips were about 4″ thick.
3. Taking the strips tape together the top and the bottom piece on the seam. Reinforce it on the top and also on the inside.
4. When you get to an edge just make a crease in the cardboard so it bends easily. Making the structures is really easy and took about 20 minutes. These held together well after getting beaten with a stick but if I was making this for adults I would reinforce it with another layer or two of paper and glue. (Just apply glue to strips of paper and wrap the structures to give it extra support.)


5. Decorating takes longer especially if you are doing a design. Take the crepe paper and make some fringey garland. (I explain in detail how to do that here.) First cut a strip of crepe paper about 3″ thick.
6. Cut each side of the strip into little pieces of fringe.
7. Unravel it and fold it in half so it is ready to glue.
8. I made a zigzag design and a scallop design for these two numbers. To maintain the design I drew lines on the number depending on how far apart I wanted the zigzags or scallops and then used that as a guide as I laid down the fringe.
9. Start at the bottom and draw the design in glue. Take the fringe and put down a layer.
10. Repeat adding glue and then another layer of fringe on top until your design is done. This part takes a while so best to put on some Friday Night Lights in the background since its a little mindless (and definitely goes quicker with a helper.) It’s nice because the fringe looks messy so it is really forgiving if you lay something down kind of crooked.
11. Cut a section at the top too add candy and then repair with paper, glue crepe paper. To hang cut two holes at the top and thread string through.


What do you think? Something you would try?

All photos and instructions by Oh Happy Day
Related Posts Plugin for WordPress, Blogger...
Pin It button on image hover