Friday, July 30, 2010

More of my home.

Here is some more of my home.

I have a feeling it wont look like this for long, as I have an urge to change the colours etc. I am thinking of a splash of green. Well, that is what I am feeling for this week!


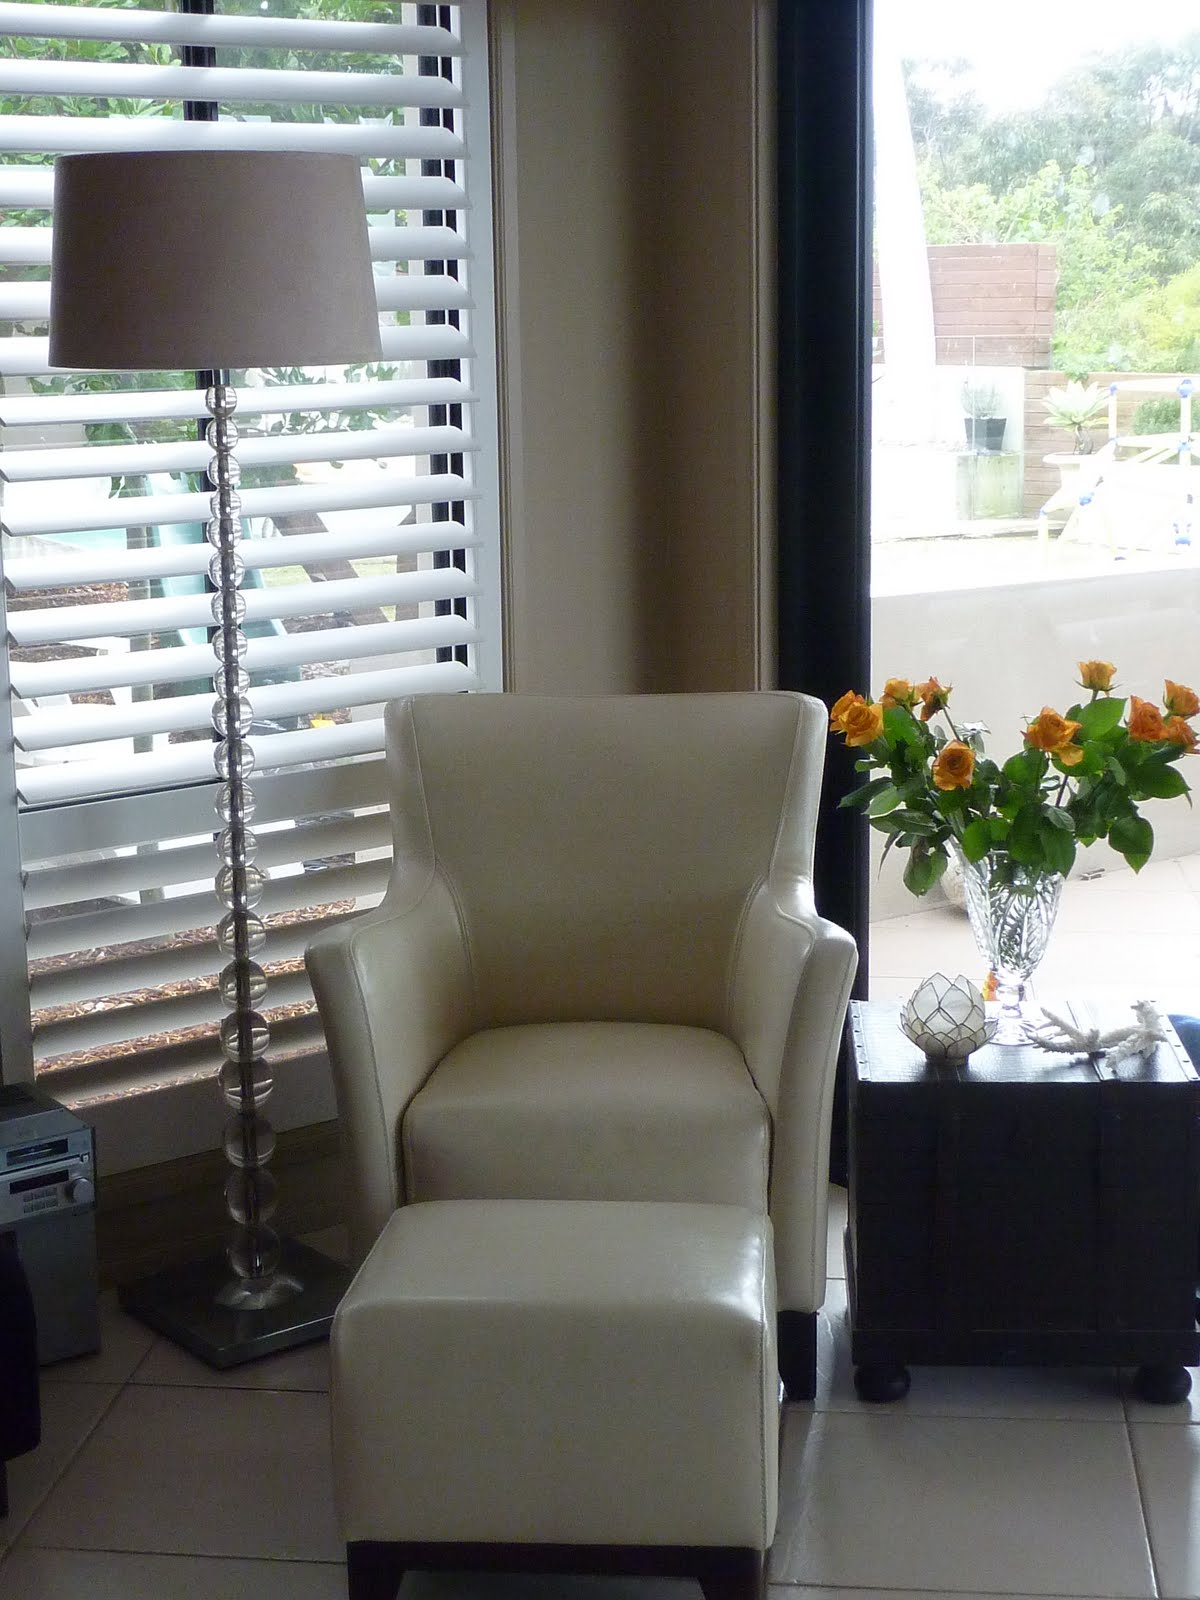
My Reading Corner, it is such a nice spot. It gets sunshine plus it has the added bonus of being able to see the boys in the backyard without having to be outside. 
I can referee from my chair!
Chair, ottoman & lamp from Freedom. Side table is from Bayswiss.


Our bedroom.
Bed, sidetables, lamps from Freedom. Quilt cover and throw from Ikea. Chandelier from Freedom, it is not wired but hey it has only been 4 years! Letters on wall from Typo. I change these around a bit. Sometimes I have love, or a canvas. It all depends on my mood! :)
You cant see it but to the left of the bed (in the pic) is the ensuite and our room also has a mini walk in closet.

Another angle.


Jasper's Room. 
Otherwise known as a toy explosion!
I am letting it go for now, as he loves it and has all his toys close by. A plus is that it keeps the toys from encroaching into the rest of the house! But I have my plans for a makeover.
I did a post on it a couple of days ago :)

My eldest son Finn's room is undergoing a transformation at the moment.
He is moving into the bigger spare room, so pics of his room at a later date.


One of my photo walls. Love having pics of the family around :)


Our backyard. 
Slowly getting taken over by more kids stuff! It's all looking a bit drab in this weather. Cant wait for Spring/Summer. Thats when this house comes alive!


The cubby. Jasper has so much fun dragging the trucks up and down the slide.
You can also see Fifi the rabbit's house. She moves constantly around the yard.


My adirondack chairs. They were an anniversary pressie from Simon, perfect for watching the boys romp around. Please excuse the fence! It is on Simon's neverending to do list to restain.
Our lovely tuckeroo trees are growing bigger every day and almost blocking out our neighbours house.
So that is a little more of my home.

Tuesday, July 27, 2010

Rocky Road Cheescake Recipe :)

Thank you to everyone for the sweet wishes for Simon's birthday.

We had a wonderful dinner out, we started with some cocktails at Sable in Manly.
 I discovered a Pacific 55 which is a blend of vodka, lychees, lime and pineapple juice. A taste of summer in the middle of winter! We had dinner at Manly wine, with a few tapas plates to share. Washed down with a white wine sangria. Too delicious. 

We were very chatty and giggly by the time we caught a cab home!
It is sooo great going out on a Friday night, for some reason it makes the weekend feel longer :)


We had a family dinner on the Saturday night and I made the Rocky Road Cheesecake, which turned out to be a huge drama! I had left it a bit late, as it needs at least 3 hours or overnight in the fridge and I couldnt find my springform pan but it all turned out ok :)

The recipe.

Ingredients - 125g sweet chocolate biscuits, 60g butter, melted, 625g cream cheese, softened, 395g sweetened condensed milk, 3 eggs
Rocky Road - 375g milk chocolate melts, 200g coloured marshmallows chopped, 4 turkish delight bars, nuts if you like.

Make the rocky road first. Line a slice pan with baking paper. Combine ingredients in a large bowl, then cover with the melted chocolate and spread onto the pan, refrigerate until set and chop into pieces.

Preheat oven to 160/140 degrees fan forced.

Process the biscuits ( I use scallywags formerly golligwogs!) until the mixture looks like fine breadcrumbs. Transfer to a medium bowl and stir in butter. Press biscuit mixture into the base of a 23cm springform tin. Refrigerate until firm.

Beat cream cheese with an electric mixer until just smooth, add the condensed milk and beat until combined. Add the eggs until combined.

Place tin on an oven tray, pour the cheesecake mixture into the tin. Press half of the rocky road into the surface.  Bake in a moderately slow oven about 1 1/4 hours or until set. Cool in oven with the door ajar. Refrigerate 3 hours or overnight. Decorate with the remaining rocky road and dust with icing sugar if desired.

Voila! A calorie fest, enjoy!!! :)

Monday, July 26, 2010

Kid's Bedrooms

Both of my son's rooms could use a makeover! 
Nothing I love more than a project:)

Here are a few gorgeous kids rooms I love.
A bit of inspiration.


Sunday, July 25, 2010

Saturday, July 24, 2010

Blogging = Inspiration!

I love blogging.
One of the main reasons is all the inspiration I receive from reading other people's blogs.
I love how everyone is sharing a common interest and are so nice and encouraging to each other.
 Its a lovefest!!

Anyhoo, I digress. I have been click, clicking away and ending up on some fantastic blogs.
One that has got me feeling all creative and inspired is Nicole from meohmymama.blogspot.com

She made this fabric garland with a friend and the tutorial looks so simple that I thought I might give it a go!


 From Nicole's blog :

I wasn't sure of which fabric to use, so I bought a few different kinds.
The silkier fabrics create a softer floppy flower, and the stiffer fabrics created more of a structured flower.
I preferred the sturdier fabrics.


I got about a yard of each color of fabric I wanted to use.
I then folded it a few times and cut it at about 3 - 4" wide.

(each cut varied)


Then, cut into the top of your fabric creating points, strips, or both.
I liked how the flower turned out the more organic the cuts were.


Unfold your fabric and thread your needle.


Fold the fabric back and forth to make your stitch.
This was the fastest way to get through all the fabric.
Once all of your fabric is thread, pull to gather the fabric down the thread to create your flower.


Knot the thread a few times to keep the middle of the flower tight.
After you finish all your flowers, glue onto selected trim.
I went with a thicker more substantial trim, which I think really helped with the weight of the flowers.

The finished product
(I also think this garland would be very pretty using all one color of fabric!)


You should definately check out Nicole's blog, and let me know of any new blogs you have come across that you love :)

Have a great day


all images and tutorial via meohmymamma.blogspot.com

Friday, July 23, 2010

Happy Birthday Sweetie!

I just want to say a Happy Birthday to my gorgeous husband Simon. He is a wonderful husband and father and we are so lucky to have him!


The in-laws have offered to mind the boys tonight so Sime and I can go out for a birthday dinner.


We will do a family dinner at our house tomorrow night.


I will be making a rocky road baked cheesecake. 
I have never met a man with a sweeter tooth! :)

I'm looking forward to dinner, just the two of us tonight.

Wednesday, July 21, 2010

A cosy day inside


What do you have planned today? Anything exciting?

Its soooo cold  and rainy outside today, too cold to go out if we dont need to. So I'm going to spend some quality time inside today, with my little man.

Lots of fun, hide n seek, singing & dancing, playing shops and reading books. We might even make ourselves a delicious hot chocolate to warm up. Extra marshmallows for Jasper!!

Enjoy your day

Rambling rose or ivy or .........

I love the look of a climbing vine growing up a house.
There is something so pretty and storybookish about it.


It's a huge commitment though, you cant just pull the vines off easily! I love the idea, I just don't think I could stand seeing it grow just a little bit at a time. 

I would want the whole house covered immediately!!

But that is my personality, delayed gratification doesn't work on me. I lose interest and move on!


Monday, July 19, 2010

I choose the arched window!

I am drawn to an arched window at the moment.
Not that it would suit my home, but I am loving them in these pictures.


What do you think?

Am I the only one that thinks of playschool when I hear arched window? :)

Saturday, July 17, 2010

Feeling floral !

I'm feeling a lot of love for floral right now!


How about you? Are you a fan of floral

Related Posts Plugin for WordPress, Blogger...
Pin It button on image hover